Dann erstelle eine leere Textdatei mit dem Namen ei.conf mit folgendem Inhalt.
[EditionID]
Professional
[Channel]
Retail
Dann erstelle eine leere Textdatei mit dem Namen ei.conf mit folgendem Inhalt.
[EditionID]
Professional
[Channel]
Retail
Um sich mit einen RPI oder anderen Nixen mit einem Fritz!BOX VPN zu verbinden benötigt man nicht viel.
Als erstes installiert man VPNC
sudo apt-get install vpncAnschließend legt man eine .conf Datei für die Verbindung an. z.b. home.conf
sudo nano /etc/vpnc/home.confInhalt der home.conf
IPSec gateway "IP oder myfritz.net"
IPSec ID "FRITZ!BOX GRUPPE / USERNAME"
IPSec secret "SHAREDSECRET"
IKE Authmode psk
Xauth username "FRITZ!BOX VPN USER"
Xauth password "PASSWORD"
local port 0
DPD idle timeout (our side) 0
Wenn die .conf Datei angelegt ist kann man mittels
sudo vpnc home.confdie Verbindung herstellen. Die Verbindung kann mit
sudo vpnc-disconnectwieder getrennt werden.
Um herrauszufinden welche Clients / IPs sich grade am WTS angemeldet haben kann man das mit folgenden befehel.
Bei aktiver Verbindung:
netstat -n | find ":3389" | find "ESTABLISHED"Bei deutscher Spracheinstellung!
netstat -n | find ":3389" | find "HERGESTELLT"1. Aktuelle Version ermitteln
dism /online /Get-CurrentEdition
2. Ermitteln auf welche Versionen man wechseln kann
dism /online /Get-TargetEditions
3. Den neuen Lizenzkey für die „Target“ Version einspielen. Nach dem dies erfolgreich war wird man gefragt ob man den Server „Neustarten“ möchte. Einfach mal „Ja“ sagen. Während des neustarts werden alle Funktionen der neuen Version aktviert.
dism /online /Set-Edition:TARGET_VERSION/ProductKey:XXXX-XXXX-XXXX-XXXX-XXXX /AcceptEula
Es gibt Dutzende Anleitungen wie man einen bootfähigen USB-Stick erstellen kann. Einige sind mehr als fragwürdig.
Meiner Meinung nach ist die die einfachste und durchaus sehr schnelle Methode das ganze Mittels Rufus zu machen.
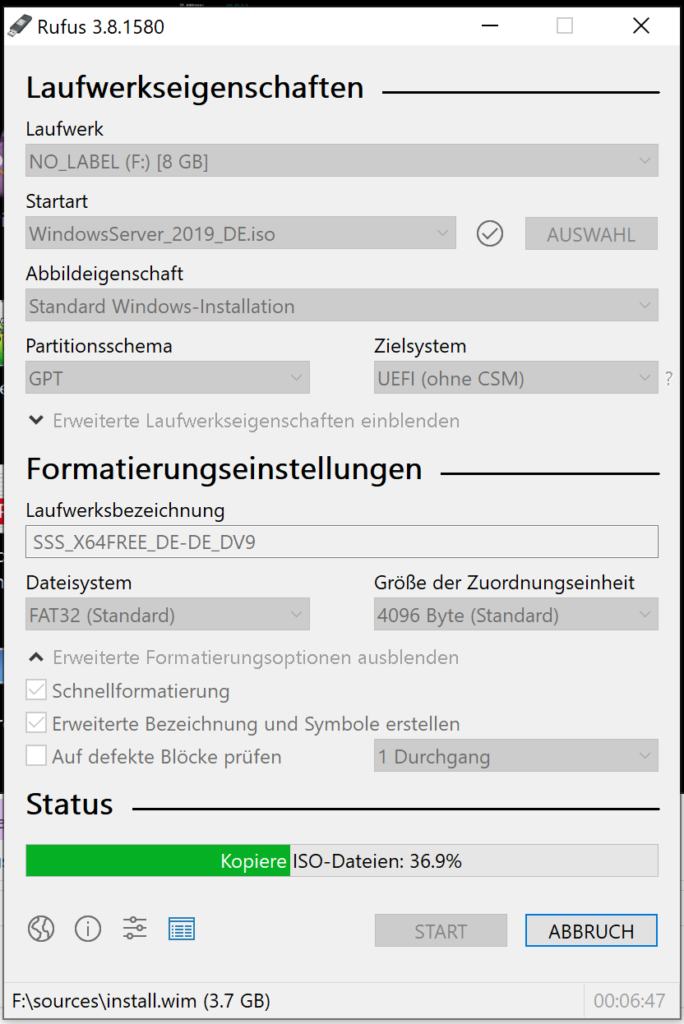
An den Voreinstellungen habe ich nichts verändert. Das erweiterte Menü habe ich zur Veranschaulichung mal aufgeklappt, aber auch dort nichts verändert.
Rufus kann nicht nur für Windows Server 2019 genutzt werden.
Kurzfassung:
cd /opt/iobroker
iobroker backup
iobroker stop
sudo apt-get update && sudo apt-get upgrade
curl -sL https://deb.nodesource.com/setup_10.x | sudo -E bash -
sudo apt-get install -y nodejs
node -v
curl -sL https://iobroker.net/fix.sh | bash -
npm rebuild
iobroker start
Quelle: https://forum.iobroker.net/topic/22867/how-to-node-js-für-iobroker-richtig-updaten
1. Einleitung
Node.js ist die Laufzeitumgebung der Programmiersprache JavaScript, in der ioBroker geschrieben ist. Ohne Node.js funktioniert ioBroker nicht.
Wie bei vielen Open-Source-Technologien üblich, entwickelt sich Node.js schnell weiter. Kleinere Updates, die die Stabilität und Sicherheit steigern oder gar neue Funktionen hinzufügen, erscheinen fast wöchentlich.
Node.js-Versionen mit gerader Hauptversionsnummer werden als LTS-Versionen (Long Term Support) bezeichnet und einige Jahre gepflegt (z.B. 8.x). In 2017 war das Node.js 8, 2018 kam Node.js 10 hinzu und im Oktober 2019 wird Node.js 12 den LTS-Status erhalten.
Im gleichem Zug erreichen frühere LTS-Versionen ihr Lebensende (EOL, End of Life). So hat Node.js 6 im April 2019 den EOL-Status erhalten und bekommt damit keine Updates mehr.
Alle Node.js-Versionen mit ungeraden Versionsnummern sind Entwicklungsversionen und sollten nicht produktiv genutzt werden.
Auch ioBroker wird stetig weiterentwickelt und nutzt die neuen Funktionen aktueller Node.js-Versionen. Obwohl der ioBroker js-controller mit Versionen 1.4.x bzw. 1.5.x noch Node.js 4 unterstützt, fordern neue Adapter immer häufiger mindestens Node.js 8 als Grundvoraussetzung.
Ab der kommenden Version 2.0 des js-controllers (das Freigabedatum ist noch nicht bekannt) sind die Anpassungen so tiefgreifend, dass die Node.js-Versionen 4 und 6 nicht mehr unterstützt werden können.
Alle paar Jahre steht also für eine ioBroker-Installation ein Update von Node.js an. Dieser Artikel soll zusammenfassen wir man dazu am besten vorgeht.
2. Wer sollte updaten?
Aktuell empfehlen wir, bei ioBroker-Neuinstallationen mindestens Node.js 10. zu verwenden. Es sind zwei Adapter bekannt, die nicht mit Node 10 funktionieren: sma-em und wetty. Sollen diese installiert werden, ist Node 8.16 die richtige Wahl. Der Einsatz von Node.js 12 ist vorerst nur für ioBroker-Testsystemen sinnvoll.
Windows-Anwendern empfehlen wir, auf jeden Fall am Test des neuen Windows-Installers teilzunehmen: https://forum.iobroker.net/post/266623
Der zukünftige Windows-Installer für ioBroker wird eine Funktion erhalten, bestehende Installationen automatisch auf aktuelle js-controller- und Node.js-Versionen zu migrieren, ohne dass man die Kommandozeile bemühen muss.
Bevor man beginnt, sollte man in der Befehlszeile mit dem Befehl
node -v
überprüfen, welche Version von Node.js gerade installiert ist. Eine gute Idee ist es, diese Versionsangabe auch mit der Node.js-Version im Übersichts-Fenster des ioBroker-Admins für diesen Host zu vergleichen. Sollten sich die Versionen unterscheiden, sind mehrere Node.js-Varianten installiert, was zu Problemen führen kann.
Grundsätzlich gilt: Sollte das ioBroker-System stabil laufen, muss Node.js auch nicht auf Gedeih und Verderb upgedated werden. Wenn aber die Installation bestimmter Adapter fehlschlägt (wohlmöglich sogar mit entsprechender Fehlermeldung) oder eine Node-Version < 4 für einen js-controller > Version 1.4.x eingesetzt wird, sollte über ein Node.js-Update nachgedacht werden. Es sind auch Probleme für die Node.js-Versionen 8.0 – 8.12 mit volllaufendem RAM bekannt, so dass wir auch hier ein Update empfehlen.
Wie bereits gesagt: Sollte das ioBroker-System stabil laufen und ist die Installation technisch nicht gefordert, muss Node.js auch nicht auf Gedeih und Verderb upgedated werden.
3. Was sollte ich vor dem Update tun?
Hinweis: Falls die Version des js-controllers <= 1.5.12 ist, muss VOR dem Update in den Einstellungen der Admin-Instanz "Verschlüsselung (https) benutzen" ausgeschaltet werden. Das in ioBroker bis dahin integrierte Zertifikat kann zu Problemen beim Starten des Admin bei Node.js-Versionen >= 10 führen.
Damit es nach dem Update zu keinen Inkompatibilitäten oder Probleme kommt sollte man alle Adapter prüfen und aktualisieren. Vor allem Adapter mit nativen Bestandteilen, wie alles mit Serialport oder Bluetooth können Probleme bereiten. Hier am besten die Adapter-Readme’s per Admin oder im GitHub prüfen, ob neue Versionen zur Verfügung stehen die die geplante Node.js Version explizit erst unterstützen. Auch wenn diese Versionen ggf. noch im „Latest“ Repository sind muss man diese vorher aktualisieren. Alternativ wartet man mit der ganzen Update-Aktion bis die neuen Versionen im „Stable“ Repository sind, schreibt den Entwickler dazu an oder fragt im Forum nach.
Wenn man diesen Schritt nicht durchführt kann es zu unnötigen Problemen beim update der Adapter kommen!
4. Step-by-step-Anleitung für Unix-Systeme
cd /opt/iobroker iobroker backup ausgeführt werden. Das Backup sollte aktuell sein, damit möglichst keine Daten verloren gehen.iobroker stop Bitte anschließend im Webbrowser prüfen, dass der ioBroker-Admin danach wirklich nicht mehr startet. Sollte er weiterhin aufrufbar sein, dann den Rechner neu starten und nochmals „iobroker stop“ ausführen und erneut testen. Für die Techniker unter uns: Man kann auch mit einem Tool wie „top“ prüfen, ob noch Prozesse existieren, die mit „io.“ beginnen. Die dann mit einem beherzten „sudo kill -9 <ProzessID>“ zwangsbeenden.curl -sL https://deb.nodesource.com/setup_10.x | sudo -E bash - sudo apt-get install -y nodejs Für macOS gibt einen Installer auf https://nodejs.org/en/download/ , den man einfach ausführt.Ob die Aktualisierung geklappt hat, kann man wieder mit dem Befehlnode -v überprüfen.curl -sL https://iobroker.net/fix.sh | bash - Er stellt unter anderem die für den Betrieb von ioBroker notwendigen Sicherheitseinstellungen wieder her.cd /opt/iobrokersudo mv reinstall.sh reinstall.dossudo tr -d '\r' < reinstall.dos > reinstall.shsudo chmod +x reinstall.shkorrigiert werden, damit es funktioniert.c) Reset aller Module in node_modulescd /opt/iobroker sudo rm -r node_modules/ Nachdem der Befehl abgesetzt wurde, fragt das Programm, ob in den Ordner „hinabgestiegen“ werden soll (sofern es ein tieferer Unterordner ist) und ob der (schreibgeschützte) Ordner wirklich gelöscht werden soll – beides bestätigt man mit „Ja“ (j) oder „Yes“ (y).Danach installiert man den Controller in der relevanten Version (hier z.B. 1.5.11 der aktuell die „Stable“-Version ist):npm install iobroker.js-controller@1.5.11 --productionAnschließend startet man ioBroker.iobroker start ioBroker wird korrekterweise feststellen, dass die Adapter, die er starten will, nicht installiert sind – und diese einfach automatisch nachinstallieren. Je nach System kann dies einige Zeit dauern – gern auch ein paar Stunden (oder bei langsamen SD-Karten die ganze Nacht). Aber danach ist alles aktualisiert. Der Installationsfortschritt ist im Admin im Log-Fenster zu sehen.Zu beachten ist, dass Adapter, die man manuell von GitHub installiert hat, den Fehler Can not parse null/io-package.json:Error: ENOENT: no suche file or directory ... im ioBroker-Log erzeugen.yourself zu suchen. Hier werden ggf. npm-Module angezeigt, die nicht automatisch installiert wurden. Sie können/sollten manuell über die Kommandozeile mit npm i <Packetname>@<version>, ausgeführt im iobroker-Ordner, nachinstalliert werden. Dazu zuerst den ioBroker stoppen, npm ausführen und dann den ioBroker wieder starten.Wenn man dabei npm als root-User per Hand in der Kommandozeile ausgeführt hat, schlage ich zur Korrektur eventueller Berechtigungsfehler vor, vor dem Start von ioBroker das Fixerscript laufen zu lassen.cd /opt/iobrokeriobroker stopnpm i <Packetname>@<version>curl -sL https://iobroker.net/fix.sh | bash -iobroker startd) Neuinstallation mit Restorecp -r /opt/iobroker/iobroker-data <Pfad_zum_sicheren_Ort> sudo rm -r /opt/iobroker/ sudo mkdir /opt/iobroker cd /opt/iobroker curl -sL https://iobroker.net/install.sh | bash - Direkt danach stoppt man ioBroker wieder (der ja nach der Installation automatisch gestartet wird).iobroker stop Dann löscht man den neu erstellen „iobroker-data“- Ordner und kopiert anschließend das gesicherte alte „iobroker-data“-Verzeichnis mit den darin enthaltenen Datenbanken und Dateien dorthin zurück.rm -r /opt/iobroker/iobroker-datacp -r <Pfad_zum_sicheren_Ort> /opt/iobroker/iobroker-data Anschließend wieder ioBroker starten. Der Rest läuft dann wie bei c) und dauert seine Zeit.von Zeit zu Zeit kommt es vor den ioBroker selbst ein Update zu unterziehen:
cd /opt/iobroker
npm cache clean
sudo iobroker stop
sudo iobroker update
sudo iobroker upgrade self
sudo iobroker startErstmal die Pool Befehle:
– Anlegen eines RAID-Z pools
zpool create NAME raidz DEVICE DEVICE DEVICE
– Anlegen eines MIRROR pools
zpool create NAME mirror DEVICE DEVICE
– Anzeigen der angelegten Pools:
zpool list
– I/O für die Pools anzeigen
zpool iostat 1
– Eigenschaften der Pool Geräte anzeigen
zpool vdevs
– Platte/Device zum Pool hinzufügen
zpool add NAME DEVICE
– Pool löschen
zpool destroy NAME
– Anlegen eines ZFS Dateisystem mit gleichzeitigem Einhängen
zfs create POOL/NAME
– Anzeigen der aktuellen ZFS Dateisysteme
zfs list
– Anlegen eines ZFS Dateisystem und einhängen unter einem nicht-default Pfad
zfs create POOL/NAME /MOUNTPOINT
– Snapshot eines Dateisystems
zfs snapshot pool/filesystem@snapshotname
– ZFS Dateisystem mounten (geht nicht mehr mit dem „normalen“ mount)
zfs mount pool/filesystem /mountpoint
– Dateisystem entfernen
zfs destroy POOL/NAME