hab da mal wieder was gebastelt 😀
Autor: Christoph
Proxmox , VMs and VLan´s
Nach einer Neuinstallation eines Proxmox-Servers wollte ich einer VM ein VLAN-Tag zuweisen. Daraufhin bekam ich aber folgende Fehlermeldung beim Starten dieser VM:
error: start failed: QEMU exited with code 1 1. Die Bridge ist nicht "VLAN aware" (Häufigster Grund)
Wenn du in den VM-Einstellungen ein VLAN-Tag einträgst, Proxmox aber auf der Netzwerkbrücke (vmbr0) nicht erlaubt hat, VLANs zu verarbeiten, bricht der Startvorgang mit genau diesem Fehler ab.
So behebst du es:
1. Gehe zu deinem Node -> System -> Network.
2. Wähle die Brücke aus (meist vmbr0) und klicke auf Edit.
3. Setze den Haken bei VLAN aware.
4. Klicke auf OK und dann unbedingt oben auf Apply Configuration.
In der shell die VM durch den Befehl starten:

qm start <VM-ID>
Da bekam ich einen neuen Hinweis, den Fehler : failed with status 6400
cat /etc/network/interfaces

iface vmbr0 inet static
    address  192.168.1.10/24
    bridge-ports eth0
    bridge-stp off
    bridge-fd 0
    bridge-vlan-aware yes    <-- Das muss hier stehen!
HomeAssistant on Proxmox install
Hier gibt es es eine sehr gute Anleitung wie man eine VM mit Homeassistant unter Proxmox aufsetzt: LINK
Obtain the VM image

- Navigate to the installation page on the HA website: https://www.home-assistant.io/installation/alternative

- Simply right-click the KVM/Proxmox link and copy the address

- In your Proxmox console, use wget to download the file

Bash:
wget <ADDRESS>

- Expand the compressed image

Bash:
unxz </path/to/file.qcow2.xz>


Create the VM

General:
- Select your VM name and ID
- Select 'start at boot'

OS:
- Select 'Do not use any media'

System:
- Change 'machine' to 'q35'
- Change BIOS to OVMF (UEFI)
- Select the EFI storage (typically local-lvm)
- Uncheck 'Pre-Enroll keys'

Disks:
- Delete the SCSI drive and any other disks

CPU:
- Set minimum 2 cores

Memory:
- Set minimum 4096 MB

Network:
- Leave default unless you have special requirements (static, VLAN, etc)


Confirm and finish. Do not start the VM yet.


Add the image to the VM

- In your node's console, use the following command to import the image from the host to the VM

Bash:
qm importdisk <VM ID> </path/to/file.qcow2> <EFI location>

For example,

Bash:
qm importdisk 205 /home/user/haos_ova-12.0.qcow2 local-lvm


- Close the node's console and select your HA VM

- Go to the 'Hardware' tab

- Select the 'Unused Disk' and click the 'Edit' button

- Check the 'Discard' box if you're using an SSD then click 'Add'

- Select the 'Options' tab

- Select 'Boot Order' and hit 'Edit'

- Check the newly created drive (likely scsi0) and uncheck everything else


Finish Up

- Start the VM

- Check the shell of the VM. If it booted up correctly, you should be greeted with the link to access the Web UI.

- Navigate to <VM IP>:8123
Proxmox 9 Installation
Also eigentlich gibt es HIER ja eine recht simple Anleitung um unter Windows einen USB Stick bootfähig zu machen.
Der BalenaEtcher hat das iso image auch auf den Stick geschrieben, aber leider hat es mein ASUS Board nicht korrekt erkannt.
Ich habe Rufus genommen, und damit hat er dann auch anscheinend den richtigen bootlader auf dem Stick installiert und wurde somit von meinem System erkannt.
Falls also der eine oder andere imager Probleme macht, dann habt ihr ja noch nen Alternativen. 🙂
HA + Matter = Alexa kostenlos
Ich möchte ja so wenig wie möglich dauerhafte Kosten fürs SmartHome haben. Daher hatte ich immer noch den ioBroker laufen. Mit dem habe ich per Skill eine Verbindung zu Alexa am laufen und dadurch eine Sprachsteuerung.
Das ganze wäre auch direkt in HomeAssistant gelaufen, aber dazu benötigte man die NabuCasa Cloud, was ein Abo bedingte.
Jetzt hab ich aber mal wieder ein cooles Addon für HomeAssistant bei Simon42 gefunden: „Ha Matter Hub/Bridge“
Einfache Anleitung per Youtube-Video und klappte auf Anhieb 🙂
ABER ACHTUNG: man kann nur Geräte oder Entitäten auswählen. Szenen sind zwar auswählbar, aber nicht steuerbar! (Vielleicht kommt das später noch hinzu) Ich hab es auch nur mit Entitäten ausprobiert.
An dieser Stelle nochmal vielen Dank an Simon42 für seine tollen Anleitungen !
Druckkostenrechner
Was man mit einem einfachen Prompt bei Gemini AI so als Webseite ausgespuckt bekommt, is schon nicht schlecht.
Prompt:
schreibe mir eine html seite. dort soll abgefragt werden: Projektname, Gewicht Druckobjekt in Gramm, Druckzeit in Stunde, Druckzeit in Minuten. Es wird angenommen, das die Filamentkosten bei 19 Euro pro 1000 gramm betragen. Die Stromaufnahme bei 100 Watt pro Stunde, wobei 1 kwh pro Stunde 0,30 Euro beträgt. Fixkosten betragen 2 Euro. Als gesamtkosten soll berechnet und ausgegeben werden die Summe aus Fixkosten, Energie und Materialkosten, plus einen Aufschlag von 10 Prozent auf die Gesamtsumme.

Füge bitte ein Feld unter dem Druckgewicht ein, welches des Preis für das Filament pro 1000g abfragt. Dies soll als Grundlage für die Berechnung des Materialpreises dienen.

Erstelle zusätzlich einen Slider unter der Druckzeit, wo ich Variable den Aufschlag einstellen kann.

unter dem Slider für den Aufschlag, soll ein Feld zu Eingabe für Fixkosten.
Und das hat er mir dann gebaut:
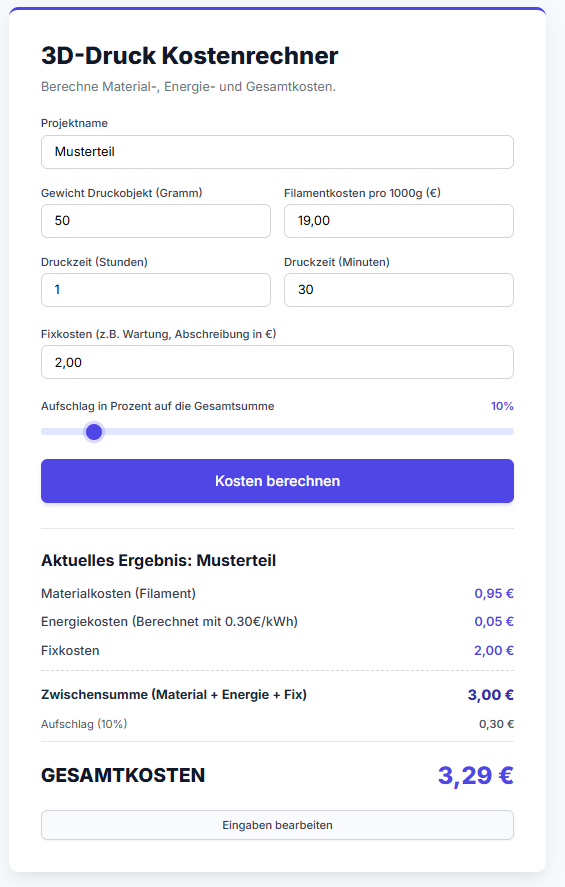
Hier gehts zum Druckkostenrechner: KLICK
Mikrotik mit „Hotel“-WLan verbinden
Da ich öfter auf Campingplätze bin, hab ich ne Lösung gesucht MEIN Plan mit dem Campingplatz-WLan zu verbinden. So können alle Geräte aufs Internet zugreifen, mit dem „heimischen“ WLan und müssen nicht jedes Einzelne ins Wlan eingebucht werden.
Ich hatte nen CAP AC von Mikrotik rumliegen, das geht aber auch mit den anderen Accesspoints von Mikrotik. Mein AP hat 2 LAN Schnittstellen, daher ist die Anleitung vom Original angepasst!
- 1. Setzen Sie die Konfiguration auf die Werkseinstellungen zurück.
- 2. Entfernen Sie Ihre drahtlose Schnittstelle wlan1 und eth1 von der Brücke (Bridge -> Ports), diese werden in einer neuen Bridge „Wan-Bridge“ zusammengefasst.
- 3. Schnittstellen -> Schnittstellenliste, ändern Sie WAN zu WAN-Bridge, da dies Ihr WAN-Port sein wird. Standardmäßig werden Firewall und Maskierung durch Schnittstellenlisten konfiguriert, daher ist es einfach, Eingaben zu wechseln.
- 4. Verbinden Sie Ihre drahtlose Schnittstelle als Station mit dem Hotel-WLAN (erstellen Sie ein Sicherheitsprofil, wenn Sie ein Passwort eingeben müssen).
- Mit der wlan1 Schnittstelle die Wifi´s scannen und das „Hotel“-Wlan auswählen, VORHER aber in dem Sicherheitsprofil das passende Passwort eintragen!
- 5. Ändern Sie Ihren Standard-DHCP-Client von ether1 zu WAN-Bridge, da dies Ihr WAN-Port ist: IP -> DHCP-Client.
- 6. Die Sicherung Ihres glänzenden neuen virtuellen AP kann keine schlechte Sache sein, daher erstellen Sie ein weiteres Sicherheitsprofil mit Passwort für Ihren AP, nennen Sie es MySmallSecProfile.
- 7. Erstellen Sie eine neue virtuelle Schnittstelle wlan3 über das Pluszeichen auf der Registerkarte für drahtlose Schnittstellen als AP-Brücke (nennen Sie sie beispielsweise MySmallWifi) und mit dem Sicherheitsprofil MySmallSecProfile.
- 8. Fügen Sie wlan3 zur Brücke hinzu. Die Standardbrücke verfügt bereits über einen DHCP-Server, sodass Sie Ihren AP sowohl über WLAN als auch über Ethernet nutzen können.
- 9. Verbinden Sie sich mit MySmallWifi und genießen Sie!
1 Grafikkarte für 2 PC´s, naja Halb
AlexiBexi hat mal wieder ein tolles Erklär-Video gemacht:
Das Hyper-V wird erstmal so wie in seinem Video umgesetzt, auch die Grafikkarten-Treiber vom Host kopieren, das Script zum Partitionieren der GPU und die Virtual sound Cable.
Dazu haben wir aber 2 kleine Änderungen bei uns umgesetzt:
- 1. Anderer Treiber für den virtuellen Monitor:
Bei dem Virtuellen Monitor haben wir folgende Treiber als stabiler empfunden (Nutze eine Radeon 6600XT): https://github.com/timminator/Virtual-Display-Driver
- 2. Alternative für den Remote-Zugriff:
Als Remote-Client hat sich Sunshine (Host) und Moonlight (Client) als praktischer erwiesen. Beide als openSource zum selber hosten.
Was geht:
- World of Warcraft
- Rocket League
Was geht NICHT:
- Fortnite (beim Starten kommt ein Abbruch mit Hinweis aufs AntiCheat Tool)
Homeassistant – verwaiste Entitäten finden (Watchman)
Hier wieder eine klasse Anleitung von Simon42, wie man Watchman nutzen kann, um alte verwaiste Entitäten zu finden und aufzuräumen.
Homeassistant – Push/Benachrichtigung über leere Batterien
Dafür gibt es eine Blaupause, die man hier findet:
Einbinden kann man diese einfach, indem man den Git-Hub Link kopiert und in HA unter:
- Einstellungen -> Automatisierungen&Szenen -> Blaupause importieren (unten rechts)
einfügt.